Wednesday, September 7, 2016

Kylo Ren Costume Part 2

Okey done, here's the first update on my Kylo Ren costume.

I got some flannel for the midcoat and am getting Yaya Han's Cosplay Collection's new black basketweave fabric for my birthday. Just need to get some 7oz duck canvas and I'll have all my materials for my soft parts.

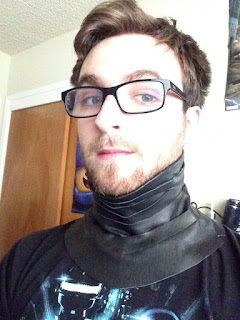
Most of my work has been making the neck seal. I tried making it from the Adam Savage video I found, but ultimately got lost with what I was doing :/ didn't seem like a very good start to my costume :(


Then I found a pattern online. And that seemed to have a much better idea of how to make the neck seal. Here's a Link to the pattern, if you're attempting this costume as well.


The pattern says to print at 100%, but that was WAY too big for my neck. Doing a bit math, I ended up scaling it down to 70%, which ended up a bit too small, as I found out it's not supposed to be "form fit", so I increased it to 75%.


After making 3 muslin mock-ups of the neck seal, I finally felt ready (but still nervous) to move on to making the actual seal.


I used a bit of cotton fabric I found from Jo-Ann's for the base and was given some real leather by my girlfriend's dad for the strips.


I can't believe how well it turned out for my first piece from scratch :) What started as a messy loss ended with a really nice new piece to my costume.


Currently, I'm working on the boots. I took the Funtasma Walker-130 boots I planned to use for my Sith costume and seam-ripped the straps off so that I could add new ones. Why take off straps so that I could make more? The Kylo boots need 4 straps each and the Funtasma ones had 3 each, and I really didn't wanna try to recreate the straps that were already on the Funtasma ones.

I took some vinyl I got real cheap from Hobby Lobby and cut them into 8 strips (1" width, 20" length) and painted the backs black.


They turned out pretty well, but they're a bit thin, so I think I'm gonna cut out some more and super-glue + sew them together, so each strap will be two strips thick. I recently ordered some buckles and, before I make 8 more strips, I'm gonna see how well the one's I've made fit, just in case they end up needing to be longer.


So that's about all the progress I've made so far. Next will be further work on the boots and then making some muslin patterns for the pleated sleeves and inner tunic. I'm also looking into what I need to get for modding my Black Series helmet to make it more accurate. Honestly I'm quite intimidated by what needs to be done for the mod (quite a bit if rotary tool cutting into my really nice/expensive helmet). But I trust it'll be worth it in the end.


Sunday, August 21, 2016

Sith Costume Update / Kylo Ren Costume Part 1

I realize I've been silent on my Sith costume for a while. Working on my thesis film, graduation, moving around and all my stuff being buried in boxes meant I haven't been able to do more work on it (and haven't been able to photograph the work I have done). In the meantime, I've decided to start another project. I'll still be finishing up my Sith costume (too much work and money not to finish it for Halloween or other conventions). My new project is a 501st Kylo Ren costume!

Okay, so here's the start of my Kylo Ren costume work in progress (WIP). I'll start this off by stating my plan for each piece, as I've been doing a lot of research but don't have much money to get started right away. Next to the piece title, I'll say how I plan on acquiring it (Scratch, Modify, Purchase).


Helmet - Modify
My Black Series Kylo Ren helmet was my first piece of the costume. I bought a Disney Store mask as well and haven't yet decided if I wanna brave modifying myself, or saving up to send it to someone else to be modified. I'm thinking, if I do send it to someone else, to go with Richard Campbell's services, as I've heard many great things about his work.

Neck Seal - Scratch
I found a tutorial done by Adam Savage on how to make the neck seal. I could much more easily buy one, but I wanna try my hand at making it myself in order to fit more pride into this costume.

Boots - Modify
I bought the Funtasma Walker-130 boots as part of another costume and found out I can use it in my Kylo costume, given some modifications. I need to replace the straps, trim the shin piece, cover the zipper, and will try to figure out how to add the pleating on the black heel (I've heard electrical tape works. I'll check it out). I'm also planning on looking into heel-lifts and insoles to make myself a bit taller.

Gloves - Purchase
I'm just gonna buy some already-made gloves. Probably from Endor Finders.

Pants - Purchase
I've already got the pants. Found some waxed black denim pants on JCPenney's on sale.

Sleeves - Scratch
Gonna try to attach the sleeves to the base shirt with heavy-duty velcro so that the base shirt (likely a sports shirt of some kind) can be taken off and washed.

Inner-tunic - Scratch
I still don't completely understand how to make this piece (I know the pleating, but how to get it shaped and have the pleating look good will take a bit more figuring out).

Mid-coat - Scratch
Dawn Bright has blessed the Kylo Ren costume-making community with a great tutorial on how to make a good simple mid-coat. I'll likely be following her instruction. Still trying to figure out which kind of wool fabric to get though.

Surcoat - Scratch
I don't completely understand the pattern for this one either, but I'm sure I'll have it figured out by the time I get to it.

Scarf and Hood - Scratch
Seems easy enough, and I'll already have the fabric (probably monk cloth) from the surcoat.

Belt - Scratch/Purchase
I'll make the base of the belt myself, but I'll likely buy the buckle and lightsaber clip from someone.

I think that's just about it. I'll try to keep up and post updates about my progress!

Tuesday, January 26, 2016

Sith Costume and Lightsabers Part 2

Alright, this is probably gonna be a bit on the longer side, cause I need to catch you all up on what I've been up to before deciding to blog about my progress (and what I've done since that decision too). So let's jump right in!

So first, there's the general Sith look. My girlfriend and I looked around some patterns (she has more experience than I do) and bought some fabric. I liked this (McCalls 6209) design, with the scarf (second one down) and the hood (third one down) combined. So I'll try for that.

I managed to cut out the fabric without messing it up (too much) and found that I can use the leftover scraps for the skirt part. I'm a bit worried that the hood isn't big enough, but I figure I can use a bit of scrap to extend it if it's not big enough. Now I just need to find a sewing machine...


For the mask, I bought a pair of welding goggles from Amazon and found a mouthpiece filter on clearance at Home Depot.


I ordered a face mask and plan to cut holes around the eyes and mouth that will be covered by the goggles and mouthpiece.


The voice changer kit arrived, so I need to put that together and find a way to fit that into the mask.


One problem is, while the speaker and mic might be able to fit into the mouthpiece, the motherboard wont. So I'm thinking I'll put the motherboard in a "small" box that will be clipped to my belt. The wires will go through a hose from the box to the mouthpiece, making it look like some sort of filter system. I got a tape measure to provide the clip.


That's what I have for the actual costume so far. I've been looking at a few things on Amazon to help complete the look.


Trying to decide between these two boots. The ones on the left are cooler, but pricier... Hmmm...


Now onto the lightsabers. I started off with some drawings then got 1 1/4" and 1" PVC (you can get pre-cut 2' segments at Home Depot). I then cut pieces of the 1 1/4" to make some details for the hilts. I need to shorten one of them a bit...


As you can see, all the details are either shaped rings, or end caps.


I've gotten a few extra pieces, such as belt clips, fancy knobs, and leather, as well as some chrome and other metallic paint. And yes, I also got LEDs and buttons. These things are gonna light up :)


Not only are they gonna light up, they're gonna have blades too. I ordered these polycarbonate tubes from Custom Saber Shop (check out their website for lightsaber stuffs


I even bought a pack of colored crystals for some added aesthetics! The bottom one is an original, the top two are some sanding trials. Still working on making them look more like they're supposed to.


I like the idea of the internal mechanisms being able to be taken out all at once, so that you have everything right there in one convenient piece. The problem is that the buttons will be poking out through holes, and will be stuck in the shell of the lightsaber. I think I may have an idea how to deal with that. Here are my plans in paper form.


And then here are the pieces laid out for another look at my plan. The spring will hold the button into the whole, as will the screw, but the screw will also serve as a way to hold the internal mechanisms in place, so that they don't move around when it's being swung around.


To hold all the pieces together, I'm gonna attach them all to a 5/8" wide wooden stick, which will be painted to look more metallic. Also, the code for the stick looks awfully close to C3PO to avoid showing off.


I also want to point out that, to screw everything together, I'll be using set screws. These look the most Star Wars-esque (although I'm sure you can point out instances of other screws being used in Star Wars).


So that's what I have so far. I'm currently working on finding a way to sew my costume together and I'm also working on the internal stuff for the lightsabers. I'm waiting for some tools for putting the voice changer together too. Stay tuned for part 3 of my build!


Friday, January 22, 2016

Sith Costume and Lightsabers Part 1

Hello! Some of you may remember that over the summer I made a Wikus (District 9) costume for Stockton-Con and Halloween. Being the nerd/weirdo that I am, I've already started work on my next costume. My girlfriend and I have decided to create our own original Sith characters from Star Wars, that way we don't have to pull our hair out over accuracy, but can still have a set of guidelines to go by (the costuming seen in Star Wars). For this, I'm going to also need an original lightsaber, so I'm also planning on putting together a few lightsabers: one for me, one for my girlfriend, and my sister's boyfriend said he's willing to commission me to do one for him, so I'll be building 3 working lightsabers. I've decided to avoid sound, since I struggled a lot with that during my District 9 costume and this is my first time building lightsabers. Perhaps later I can mess with the sound. So, let's get into the plans!

With the latest Star Wars film, I've sort of become re-obsessed with the series. Kylo Ren has become one of my favorite characters, so quite a bit of my suit will be influenced by his design.


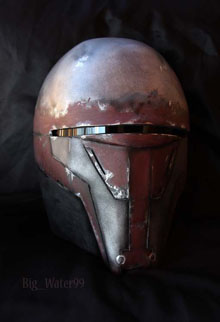
That being said, I wanna be my own Sith, so I won't exactly be copying Mr. Ren there, just taking the bits that I like. For example, the helmet. For some reason I really like a good bad guy with a mask or helmet (Darth Vader, Joker, Yokai) so I'll be going back to that good old Insta-Morph to make myself a mask. I've discovered Pinterest is a good place to get some pictures for inspiration (I know Pinterest is old news, forgive my ignorance).

Sith Lord Kallig’s 3D Printed Helmet from Star Wars: The Old Republic http://3dprint.com/81836/3d-printed-lord-kallig-helmet/: Ma next costume project! Anyone with advice feel free to tell me anything you found handy in making masks or helmets!:
Browsing starwarshelmets.com, I was reminded that there are some pics of mine up there! This was taken back when the Star Wars exhibit was at the Boston Museum of Science.: star wars custom mask the old republci sith acolyte darth revan

Also a good place for the lightsabers, which I've decided to build out of PVC.

Custom Lightsabers Will Make You Really Feel Like A Jedi By Daniel Perez on 04/26/2013: Here's how I go about building a PVC lightsaber. 1. I get my PVC stock and parts. 1” and 1-1/4” PVC, 1” male and female connector and black O-rings. 2. I cut the main body of the hilt from 1” PVC. I cut this stuff by hand. I don't have a miter saw. 3. I….: Lightsaber by skullalf:

I've actually already done a bit of work on this costume. I wasn't originally planning on writing a blog for it, so I don't really have any pictures of the first few steps. I apologize greatly. BUT! I'm still in the beginning stages, so I still have plenty of stuff to show the process of. Pictures of what I have so far will come later, as I'm in the process of moving back into my apartment in San Francisco to begin my last semester of college.

Finally, if I'm gonna be an original character, I'm gonna need a backstory! Part of me wanted to wait until I got the costume together, but I couldn't help but develop some sort of a backstory based off of the plans I already have. Here's a look at what I have so far (yes, it's a bit long, I'm sorry). It's also subject to change as the costume comes together.

(Time period: Pre-Darth Bane)
Kajj Napeel grew up on a planet in the midst of a civil war. He'd been surrounded by fighting for pretty much his entire life. When he neared the end of his teen years, he discovered he was more attuned to the Force than others. He gave up everything he had to travel to the Jedi Council and ask to be trained. Once he got there, they told him he was too old and unstable, and could not be trained to be a Jedi. Devastated that he now had nothing, Kajj ran off, but then "happened to" bump into a mysterious man that promised him he could train him in the ways of the force. The man turned out to be Darth Lehr, and, by the will of the Force, renamed Kajj to Darth Kajjak. During his training, Kajjak found himself in a fight with the infamous pirate, Ressum Glumk, known for wearing a helmet that amplified his voice for intimidation. Kajjak lost the fight and left with a scarred up face and a whole lot of rage. Once Kajjak had finished training and built his lightsaber, he hunted down Ressum. After locating him, Kajjak attempted to behead him, but missed and cut off the front of his infamous helmet. After a quick scuffle, Kajjak succeeded in killing Ressum. After the assassination, Kajjak retrieved the sliced-off front of Ressum's helmet, and now wears it as a trophy to hide his scarred face.