Tuesday, July 28, 2015

District 9 Wikus Costume Part 5.5

T-Minus 11 days to Stockton Con

Aaah! It's almost the final countdown! I realized I forgot to post pictures of the fully shaped gun put together. So here they are.


So far I think it looks really cool! I'll be painting it sometime on Wednesday or Thursday. In the meantime, I'll be trying to figure out the programming tonight.

I've made some changes to the plans. For one, I decided not to do the spinny-bit. I think it's just one more thing to figure out and I don't have much time left. But I decided to add a yellow/orange LED to the barrel, so that firing it will make a light come out. I'm still deciding if it will be too ambitious or not to have the reed switch (the thing that makes it so that the gun can't activate unless I'm holding it with a magnet).

Monday, July 27, 2015

District 9 Wikus Costume Part 5

T-Minus 12 days to Stockton Con.

Over the weekend I really got to working on the gun, and I feel I made quite a bit of progress.

First order of business was prepping the Puff Paint bottles to become alien-goo-stuff canisters. I got myself a hacksaw and cut off the nose thing on the caps then sanded the top of the caps down flat


I had to empty out the paint into a bag. Still wondering what I should do with my bag of mixed Puff Paint.


I found that my alien glove fingers couldn't fit into the trigger guard, but that made a bigger hole in the gun, so I had to cover it.


I took some thin plastic and used an exacto-knife to cut out the right shapes to cover up the holes. I had to cut them in half so that I could still open the gun to mess with the insides.


 Next, I used my grandfather's drill-press to make some holes in the exhaust-like section of the gun, and then 4 holes where I plan to put the LEDs.


I put quite a bit of work into sanding the gun before I remembered that you can't see the details too well on the gun after it's painted. The only thing you can really see is the NERF logo. I might have to cover that up or sand it down more. Parts of the gun do look much nicer now though.


 My original plan was to superglue the canisters to the gun, but my dad suggested I screw them into the gun instead. That way they're more secure, and can even be taken out and changed, in the case that one breaks. I drilled some holes and made some thread cuts, then used a screw and washer to hold the cap onto the gun.


After all the caps were installed, I just screwed in the bottles. The gun is looking a lot more District 9-esque now, though it looks a bit silly with all the different colors.


I made another trip to ReCreate and found a much better canister. I used a PVC adapter (partially covered by a hose clamp)
to screw it onto an ink bottle I found then screwed the ink bottle onto the magazine.


By that time, the weekend was over. I'll be doing more work over the next couple days and hopefully I can figure out the Arduino programming.

Friday, July 24, 2015

District 9 Wikus Costume Part 4

T-Minus 15 days to Stockton Con

Really closing in on Stockton Con. Things are starting to come together and the end is in sight. It's actually pretty bittersweet. This costume was both fun and frustrating, as I'm sure many cosplay projects are.

First off, something I really should've gotten to begin with, the clothes. The shirt was easy enough to find, but the pants were a pain. Finding pants in my size is never easy. The shirt is actually tight enough, I'm considering just attaching the alien skin pieces to the sleeve instead of my arm. That way I can just slip the shirt on and don't have to apply each and every piece to my arm.


I have started making the alien skin pieces. As I've said before, I'm using InstaMorph to make them. I'm finding it difficult to make smooth shapes with the pellets, and will probably try using a rolling pin in the future.


For the alien hand, I went to a dollar store and found a pair of rubber gloves. I didn't completely know how to make the alien hand, so I thought I'd try on the right glove as a test, much like how I did with the gun piece.


I forgot to get a picture, but I made paper claws and stacked them on each other to make the claw shapes. I then taped together my fingers to get the three-finger shape on my glove.


After I got the shape I wanted, I started applying liquid latex to the glove. If I had the materials, I'd just mold one, but I don't. I'm sure some people are questioning my intelligence at this part.


It dried nice, but there are still some open parts in the tape. I'll do a better job of applying the tape on the glove I plan to use, but for now I'll see if I can fix it with the liquid latex.


I figured I'd try 3 things, since there are 3 fingers. The left-most finger has tissue poorly applied to it with the liquid latex. The middle-finger has nothing done to it. The thumb has an extra layer of liquid latex. I'm gonna warn you, if you plan on using this stuff for the first time, it smells awful. Just be warned.


I haven't made a whole lot of progress on the gun, just getting more pieces and stuff. The Arduino is pretty difficult to figure out and I'm worried I won't have it figured out before Stockton-Con. I've made a few decisions about the gun since my last entry. For one, I decided not to have the Portal-gun-like arm-spike things. I also decided I don't want the tubing around the outside of the gun, and instead I'll apply it to some of the openings in the gun. Finally, I decided not to use wine bottle corks for the canisters on the top, they're too textured. I decided, instead, to use a few of these paint bottle things.


Don't have too much else to say. I plan to get a good amount of work done this weekend, including finishing making the skin bits, and getting to work shaping and painting the gun. Stay tuned for an update soon after.

Friday, July 10, 2015

District 9 Wikus Costume Part 3

T-Minus 29 days to Stockton-Con

Starting to feel the pressure. It's less than a month until Stockton-Con and I feel like I haven't nearly gotten enough done. Can just hope for the best and do what I can.

The tubing I mentioned in Part 2.5? It arrived! (Finally). And to celebrate their arrival, one of my dogs chewed up the package... Luckily I was able to salvage a good amount of the tubing. Plenty to do what I want.


One idea I've had is making the soundboard accessible from the top opening slide, so that I can change the sound effects if I wanted to. Problem was, the magazine clip went to nearly the top of the gun, leaving no room for the card. So I took out the spring mechanism (gonna put a battery in their, remember?) and cut it in half... Or a third... I cut the top off.


Next was to saw off part of the trigger guard. I'll have big fingers on my alien hand, and I wanna be able to hold it, so cutting off part of the trigger guard was the best way I could think of to do so. Wish I could've cut off more, but I didn't wanna ruin the gun.


Unfortunately, the part that I cut off was hollow, so I'll need to find a way to plug up the ends while still allowing the gun to be opened up. I've got a couple ideas, we'll see how they go later.


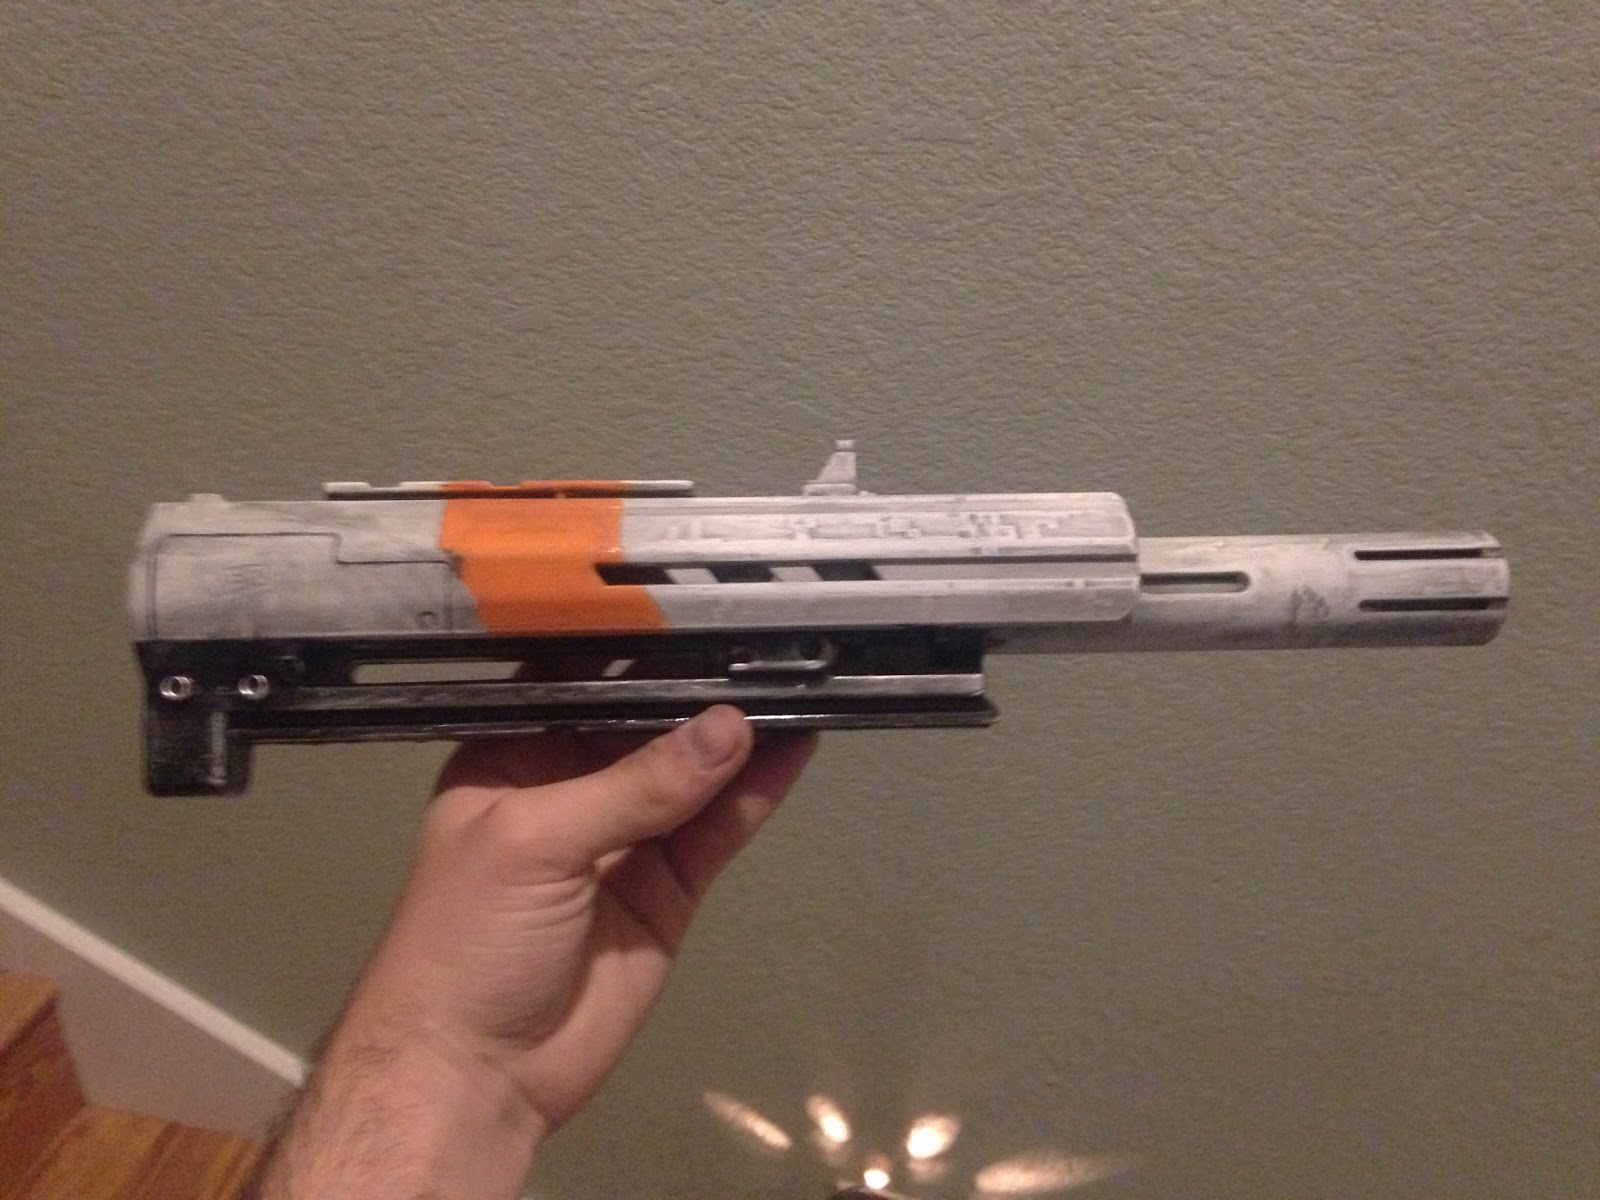
I didn't wanna go into painting my gun blind, so I took the barrel extension piece and did some painting tests on it. First order of business, put some primer on it.


Then put on a layer of white paint. If anyone is curious, I used Krylon spray paint. I noticed that District 9 guns tend to have orange stripes and stuff, so I taped off a section to paint orange.


While that was going on, I tried painting one of the wine bottle corks to see how it looked. It didn't turn out bad... But I'm not happy with the textures. Sometime next week I'm gonna see what I can do to get a nice, smooth surface. If you have any ideas, let me know in the comments.


Back to the gun. The orange turned out pretty well. For some reason the white appears different shades on different pieces, but I'm now pretty sure it was cause I only sanded part of it, and the "whiter" white is the section I sanded. Will have to keep that in mind for the actual gun. Next I'll do a "wash" over it. A technique I heard about, where you brush some oil paint over it and quickly wipe it away. The paint stays in the crevices and brings out some really nice details.


The wash was a failure. Complete failure. It turned my gun gray and made a huge mess of my hands and sink. Now I have a pricey tube of black oil paint and nothing to use it on while I'm at my current level of experience (or lack of)...


Had to repaint. Turned out nice, but there were a few cracks in the paint. It actually looked kinda cool and added to the weathered effect.


I applied some metallic black paint to the bottom section. It looks meh now, but I know a trick for making it look better. I also tried doing the "wash" again, only with acrylic ink... Again, it didn't work. Gah!!!


The technique for making the black look better? Get some metallic silver paint, get some of it onto a paper towel, wipe off some of the paint onto another paper towel (or rag) until there's just a bit left on the paper towel, then lightly brush it along the black area. Makes it look more weathered and metallic and just looks really cool. I tried a bit of it on the white and turned out a bit meh.


For one final attempt at giving it a wash, I used black acrylic paint with quite a bit of water in it. It still turned the gun gray, but not as gray. I've now given up on the wash idea and I'm starting to think I'll just go over the crevices with a pen or something... The final result looks really nice, but it doesn't look like a District 9 gun, it looks like Halo.


I only painted the one side, and left the other side alone in the case that I wanted to try it again, which turned out to be a good idea in hindsight. Next week I'm gonna try again with some new ideas and see how it goes.


In the meantime, I keep forgetting to work on the alien bits, and I still haven't even started on the hand. If I want to finish by Stockton-Con, I'm gonna need to work faster. Expect more frequent and/or longer updates to come.