First thing I did was look for bits to add the gun. For most of the bits, I went over to ReCreate over in Roseville. They were incredibly helpful in helping me find what I was looking for and had a good variety of stuff.
I was very excited to find this empty canister. District 9 guns seem to all have canisters of some kind, so this will be perfect for adding to the gun. Only thing is I'm still not sure how to attach it to the bottom of the magazine at a 45' angle. I'll have to try and find a sloped object or try and make one out of the InstaMorph.
I don't know what these are, but they looked pretty cool so I thought they could possibly be used somewhere. Admittedly, I still don't know where to use them, or if I'll even end up using them. Time will tell.
If you look at the AMR-B05 from District 9, you can see it has quite a few smaller canisters along the edges of the top of the gun. I thought I could get the C02 cartridges you use in some gas airsoft guns, but I didn't know where to find those and thought they'd be a pain to work with with they're small end. Thankfully, ReCreate has a bin full of wine-bottle corks. While they don't look like the canisters on the AMR-B05, remember that I'm creating my own custom gun and I'm not really going for a specific one, so some difference in pieces/appearance is a-okay with me. I plan to detail these somehow and then paint them silver or chrome.
One idea I liked was having sort of spike-arm things sticking out of the front, similar to the Portal gun. I couldn't find anything to do that with at ReCreate, but I found these plastic stakes at Home Depot. Unfortunately, I couldn't find a pack of just 2, so I had to settle with a pack of 4. Now I just need to find something to use for the arm to hold out two of them on top of the gun.
Finally, I ordered a thin, ribbed hose online to create some tubing on the gun. It's been taking a while to get here though. I might not be posting any pictures of it until it's already attached to the gun.
Last night I worked on getting the gun open to get an idea of the internals, as well as make it easier to paint the gun. It was an absolute pain to open it because the previous owner stripped one of the screws and glued a couple inside parts together, but my dad and I eventually got it open.
I took out some of the internals that fire darts, because they're taking up space I need for the electronics, and Stockton-Con doesn't allow gun props that are able to fire projectiles anyway. What I did keep in there are the trigger, magazine catch, barrel, and the slide at the top of the gun.
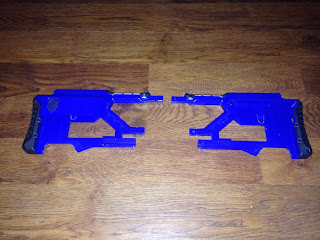
I didn't care much for the magazine holders on the sides of the stock of the gun though, and I noticed that they weren't completely attached, so I started working to get the stock open. I soon found out that some of the bits were glued together, keeping both halves together. I didn't want those bits anyway, so I sawed them off.
Later I'll sand off the uneven cuts. I managed to get the magazine holder off, but I still didn't care much for how it looked... I still cant decide whether or not I should keep them on.
Trying to think of what I can do to solve this. Do I cut out part of the stock? Do I fill it in somehow? (Don't know how). So I just put up with the magazine holders? If you have any thoughts, send me a comment.
Next I'll be painting the gun and it's bits as well as working on the alien skin. Also, big thank you to ReCreate for helping me find what I needed for this project. If you're in the Roseville area, be sure to check them out. Here's a link to their website, check it out for their location and hours - > http://www.recreate.org/
T-Minus 39 days to Stockton-Con


No comments:
Post a Comment